Monday, July 19, 2010

No Bake Chocolate Oatmeal Cookies


The first time I ever had No Bake Chocolate Oatmeal Cookies I was in eleventh grade. I was 'in love' with my high school sweetheart, and his mother made a batch of these cookies and I declare, I think I forgot all about her son with my first bite. Of course, the cookies were eaten and I came back down to earth and once again mooned over her son. This happened periodically over the next year and a half - the duration of our courtship. But eventually, I out grew that romance. But I NEVER outgrew my love for these cookies!


Mrs. 'M' gave me her recipe for Chocolate Oatmeal Cookies, but over time the scrap of paper was lost. For many years, I was Choc-Oatmeal-Cookie-less. But as luck would have it, I purchased a cookbook on one of my many trips to the mountains, and low and behold, there was a recipe identical to Mrs. M's recipe. I have since also found the same recipe on several cooking/recipe sites on the web.

Now, these cookies are a Christmas tradition at my house. Usually, a couple of weeks before Christmas I make several different kinds of cookies, and this one is one of the favorites. And sometimes, I can't wait for Christmas time, and I make a batch just for my pure enjoyment. 


Warning: Occasionally, no matter how closely you follow the recipe, and no matter how carefully you measure the ingredients, or how carefully you time the boiling, these cookies will simply not turn out right. They will sometimes just not 'set'. They will end up a gooey, gloppy, mess. However; I have learned that even if they do end up a ooey-gooey mess that can't be picked up without the aid of a spoon, the are still delicious! Just put them in a bowl or on a plate and eat them with your spoon!


My version of No-Bake Chocolate Oatmeal Cookies

Ingredients:
2 cups sugar
1/2 tsp salt
1/4 cup cocoa
1/2 cup milk (whole works best)
1/4 cup butter
2 cups minute oats
1/2 cup peanut butter
1 tsp vanilla


Directions:

1. Mix sugar, salt & cocoa in saucepan.
2.  Add milk and butter; mix well and bring to a boil over medium heat.


3. Remove from heat and add remaining ingredients. Mix well... 
...mix until the peanut butter is all dissolved. The mixture will start feeling thick. 
4. Drop dough in scoop or spoonfuls onto wax paper... 
...be sure not to waste a single morsel! 
The 'perfect' cookie is about 1.5" to 2" in diameter, 'sets', and is glossy until it dries. Store uneaten cookies in air tight containers for a day or two. If there are uneaten cookies after day two, move them to the 'fridge. They are delicious both hot and chilled!

Kitt Cat's Simple Notes:
* use chunky peanut butter for a nutty take on these cookies!
*eat these cookies soon, they don't store well
*will keep longer if stored in a plastic zip bag and stored in the fridge

Wednesday, April 28, 2010

Affordable Home Decor

Need to fill in an empty wall or need a new focal point for a shelf? You need not look far if you have children...just start saving their best art efforts from school, daycare, or summer camp!

I have several finished framed art projects in my home, and several art peices that will one day find a home on my walls or on a shelf or dresser.

Items Needed to Make Affordable Home Decor:

*Drawings, paintings, prints, etc. from your child, grandchild, neice/nephew, or a friend's child
*Mats
*Frames
*Scissors or craft knife
*scotch tape


Instructions:
*Choose your piece of art you wish to display in your home.
*Find a frame that is large enough to accommodate the art without having to trim away important parts
*Trim as needed with scissors or craft knife
*If possible, add a mat that coordinates with colors and/or textures in the art piece
*Attach the art piece to the mat with scotch tape if needed
*Place the matted art piece in the frame and display!

Simple tips:
~Use drawings or paintings that fill up a page, or use several smaller drawings to make a collage
~Use a coordinating mat color...if the art piece has small amounts of red, use a red mat to bring out that       
   vibrant color
~Have your artist sign and date his creation if not done so already
~If you need art, have an art party with your kids! Provide paper, paints, brushes, crayons, pens, etc.


                                                                               crayons-10th    grade

My display of Affordable Home Decor, located in my kitchen. The shelf was purchased at a garage sale for $3.00 and painted green to match the greens in my kitchen. The Apple clock was a gift from my Mom, ordered from ABC catalog, about $10.00. Other items collected from garage sales and thrift stores.

Saturday, February 27, 2010

Fondue for Two

I have dined at a couple of fondue restaurants...Dante's Down the Hatch, on Peachtree Road in Atlanta, and The Melting Pot, in Duluth.

Eating 'fondue style' is fun. It is 'communal eating'...everyone sits around a pot of melted cheese, chocolate or oil and you dunk stuff in it!  You usually start out with an appetizer of cheese and bread and fruit. The main course tends to be your meat, seafood and/or vegetables, which you deep fry. The dessert...mmmmm...the dessert is hot, melted, chocolate goodness! You dunk fruit, marshmallows, poundcake, and other goodies in the thick gooey deliciousness.

With the economy the way it is right now, dining at either of these two restaurants is pretty much out of the question. So what can I do to satisfy my craving for fondue?

Well, my friend Val comes to the rescue with this great SIMPLE and INEXPENSIVE idea!!!

First, raid your food pantry and refrigerator to see what you have on hand before you go to the grocery store. It is possible you may have everything you need at home!

Ingredients:
(1) can of chocolate frosting
(1) small jar of raspberry preserves
assorted fruits (apples, bananas, pears, strawberries all work well)
marshmallows
graham crackers
pound cake
brownies

Instructions:
*In a small microwave safe bowl put about 3/4 cup of chocolate frosting.
*Add to the bowl about 1/2 cup of raspberry preserves. Mix well with a fork and set aside.
*gather the other ingredients and chop fruits, cut pound cake and brownies, and break graham crackers all into bite size pieces.
*Now pop the frosting/preserves mixture in the microwave and zap for 20 seconds. Stir and zap for 10 seconds. Stir. Carefully test the fondue. It should be very warm, but not so hot as to burn the mouth.
*Spear the fruit, cake, brownies and marshmallows on forks or skewers and dip into the fondue. Yum!!!!!

                                                        (Put your two fondue ingredients
                                                               in a microwave safe bowl)


                                                                       (Mix it well!)
Simple Notes:
1.  I had a can of Duncan Hines Home Style Classic Chocolate frosting in the pantry.
2.  I used store brand raspberry preserves with seeds, it was about $2.00 cheaper than the seedless.. After mixing and heating the the mixture, I did not notice the seeds.
3.  I used fruit and crackers and brownie mix I had on hand. I got a bag of store brand marshmallows for $1.09.
4.  For variations on this recipe you could try substituting strawberry preserves or peanut butter for the raspberry preserves!

                                                           (Use forks, toothpicks or fondue
                                                                  forks if you have them!)


                                                              (Just enough for one...
                                                                or two to share!)
                                            
 I made this fondue the day we had snow on the ground! It was fun to eat while watching movies and watching the snow fall!

Monday, February 15, 2010

Super Simple Breakfast For Two

You want something simple, inexpensive, and easy to make for breakfast....and a bowl of corn flakes is not going to cut it!

What you need is French Toast! Here is my simple version of the breakfast treat.

Kitchen items you need:
Shallow bowl or container
Whisk
Frying Pan
Spatula


Ingredients you will need:
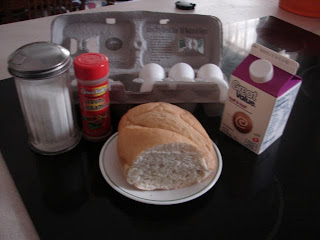
(4) Eggs
(6) Slices of French bread (1/2" slices work well)
(2) Tablespoons of half and half
butter or margarine
ground cinnamon and sugar


Start out by heating a tablespoon of butter or margarine in a frying pan on medium heat.

Crack all four eggs into a bowl and add two tablespoons of half and half. Whisk together until blended. 
Dip the bread, one slice at a time, into the egg mixture, coating both sides of the bread.

Gently transfer the bread from the egg mixture to the pan, The butter should be hot enough that the egg begin cooking immediately upon contact. Sprinkle the bread with cinnamon and sugar to your liking, and again on the other side when it is flipped.

Continue dipping the next two slices of bread in the egg mixture and add to the pan.
Turn the bread back and forth until the egg and bread is cooked a nice golden brown color.

Move the cooked pieces to plate and repeat the entire process for the next three slices. You can keep the first batch in the oven or toaster oven on an oven safe plate while the second batch cooks.

Place three slices of French Toast on each of two plates. Drizzle with syrup if desired. Garnish with strawberries, blueberries or banana slices to make the dish more elegant.

Enjoy!


Simple Notes:  
1)  All ingredients are food items you might always have in the fridge and cupboard.
2)  If you don't have french bread on hand, you can use almost any kind of bread. I found     this loaf at Wal-mart on sale for ninety cents! Just keep in mind, some breads work better than others. The denser breads work better.
3)  Use milk if you don't have half and half on hand.
4)  My plates are thrift store finds...Corelle dinnerware...found in most thrift stores in sets, small groups or individual pieces. I mix and max patterns. 
5)  The tablecloth pictured here is another thrift store find. It is a heavy white cloth with what appears to be an iron on design. Someone had embroidered the strawberries and greenery, leaving some of the smaller designs unfinished. I may finish it at a later date. I got this beautiful cloth for $3.00!

The Simple Life

This blog was designed for people who live a simple life, either by choice or necessity. Here, you will find ideas and stories about living simply and happily. There will be recipes, crafts, tips on everyday tasks, decorating, gift-giving, shopping and more, more, more! The best thing about this blog, is that all the projects are cheap and many times made from things you find around your home!