Saturday, June 23, 2012

Thrift Store Shopping - June 23, 2012

Do you thrift shop? If not, you need to try it!  Here are some thrift store and garage sale finds for the week!


Christmas Plates - set of four with cooridinating bowls and saucers. 25 cents each at the FISH thrift store - Loganville, Georgia.


Two Paula Deen hard back cookbooks - $1.00 each - FISH thrift store also!


Children's books - like brand new - clean, no writing on pages - 75 cents each - Goodwill, Lawrenceville.

Sconces - $2.00 for the pair. Garage sale.

Metal pinecone candle holders - .99 for the pair - Salvation Army Store - Covington. 


Thrift store shopping can be a lot of fun! You can find some real bargains! Of course sometimes you can get ripped off too. Make sure if you buy clothing to look for stains, missing buttons, tears and busted zippers. When buying other items look over the item carefully for tears, breaks, cracks, and missing parts. Things bought at garage sales and thrifts stores typically cannot be returned or exchanged. You can usually buy items for a fraction of it's 'brand new' cost. But Goodwill has really gone up on their prices and sometimes you can find the same items new at Walmart for a lower price! Just go thrifting...and have fun! Only buy items you can really use as it is or that you know you can re-purpose! Go with an open mind and you can find all kinds of cool stuff!

Thursday, May 3, 2012

Easy Cafe Coffee Drink!

Do you love the coffee drinks you get from Starbucks? Or even the cheaper versions from McDonald's or other fast food (fast drink) places...but hate the prices?

You can make a DELICIOUS version of these drinks in the comfort of your own kitchen...at a fraction of the cost! It's easy! Really! 

Just follow Kitt Cat's simple instructions for a YUMMY coffee delight!

You will need:

Instant Coffee
Boiling hot water
Flavored syrup
ice cubes
coffee creamer 
milk
whip cream
chocolate syrup


First, you need some instant coffee. Regular or decaf...your pick!


Put two spoons full of instant coffee into a tall cup or glass. I use Folger's Decaf.

Add a tablespoon of flavoring. I like Torani's sugar free Classic Caramel. You find these syrups in the coffee section of your grocery store or Walmart.  They come in regular and sugar free flavors...like vanilla, caramel and hazelnut!
Mmmmm - - - sometimes I add another 1/2 tablespoon of flavoring!


Next, add  three tablespoons of boiling hot water - for a stronger coffee taste, only add two tablespoons of water. I heat my water in the microwave for 2 minutes while I am assembling the other ingredients.


Now you want to add ice cubes...if your glass is tall...add about 10 ice cubes. If your glass is short, add only eight!

Now you have coffee, flavored syrup, hot water, and ice cubes.

The next step is to add some creamer...I like French Vanilla flavor! I add about 1 inch of creamer to my glass. Stir with a spoon!


Now, add some milk...filling the glass/cup all the way to the top!

Stir, stir, stir up the goodness!

Now comes the fun part! Add some whipped cream to the top!

Oh! I am making myself thirsty! Your creation is almost finished!


The final touch is a drizzle of Walden Farms Sugar Free - Calorie Free chocolate syrup!

The chocolate syrup makes it so special! And not a single calorie involved! You can find Walden Farms syrups on the grocery aisle with ice cream toppings!

Now, just pop in a straw and enjoy your Cafe Coffee drink! Sluuurrrpppppppp!!!  


Kitt Kat's Simple Hints:

*Make your cafe coffee decaf if you get the jitters
*Use low fat or sugar free creamer and whip cream 
*Use sugar free syrups
*Use whole milk for a richer drink...or low fat or skim milk for a lower fat version
*Occasionally I enjoy a coffee treat from Starbucks or McDonald's. When I do, I save and reuse my cup!


Sunday, January 22, 2012

Make a Super Easy Lanyard!


  • A measuring tape or ruler
  • Ribbon (I used grosgrain)
  • Split ring 
  • Decorative button
  • Scissors
  • Needle and Thread

 Step 1.  Cut a length of ribbon to suit your taste and/or use. I used a piece about 38 inches long.


 Step 2. Threat a split ring onto the ribbon.


Step 3. Bring the two ends of the ribbon together so that the ends are together and even. Then fold the ends over about 1/4" and stitch the ends down and tie off.


                                         Step 5.  fold the ribbon about 1/2" to 3/4".


                                              Step 6.  Holding the ribbon down, place a 
                               coordinating button on top, covering the edges 
                               that were sewn together in step 3. Sew the button
                               on, going all the way through both thicknesses of 
                               the ribbon.


                 The lanyard is now complete! You just slip it over your head 

                 to be used to hold a badge for work or school. Or attach a 
                 key to use as a key holder. 


Here are two I made with the same ribbon, but different colored buttons! My job requires we wear an i.d. badge, and this is a great way to have it close at hand!


Simple Tips:
  1. Make lanyards in all different colors and patterns to coordinate with your outfits. Lanyards sell from just a couple of dollars up to $15.00 at stores. You can make them in many colors for probably $1.00 or less each.
  2. For key straps, make the lanyard about 1/3 the length of the ones you wear around your neck.
  3. Ribbon lanyards are inexpensive and easy to make. Make them to sell at church bazaars or other fund raisers. Make them in local school colors!
  4. Look for future posts for other lanyard ideas!

Saturday, August 6, 2011

Thinking Ahead...to Christmas!

It's only August, But I am already thinking about Christmas! It's time to think ahead to gift giving...if not about the gifts themselves, then the wrappings and gift tags! 

I love beautiful wrappings...red, green, silver, and gold papers. Silky ribbons and fluffy bows. I like store and bought, and hand made!

I also like EASY! Easy translates into gift bags!!!! All year round I keep the paper shopping bags you get at some stores at the mall and some gift shops. They are usually pretty sturdy and have either a paper, ribbon or cord handle. These can easily be transformed into cute gift bags for Christmas! Lets make some!!!

Also, I keep my Christmas cards and recycle them for this project!

Items to gather:

Bags (paper bags with handles gathered year round from shopping or can be found in craft stores and places like Walmart)
Last years' Christmas cards
Wrapping papers or scrapbook paper
Glue (white craft glue, spray adhesive, stick glue, or hot glue - your choice!)
Glitter
Stickers
Scissors (regular and special edging or scrap-booking scissors)
Hole puncher and/or other punches

Get Started!
1. Gather your supplies and designate a crafting area.


2.  Make tags by cutting out small pictures from the inside or back of Christmas cards...or the phrases from inside the card. Glue to a piece of scrapbook paper or card stock. Use scissors to edge the tag with zigzags or other shapes. Use a hole punch to make a hole for your ribbon.


3. Cut out pretty Christmas card scenes and phrases and glue to the front of shopping bags. . . making sure to cover up any advertising from the store. If needed, cover the bag with gift wrap first to cover large areas of advertising.


Color coordinate your cut-outs with your bags.

Large pictures on smaller bags makes a better use of your space.


Using scrap-booking scissors add a special touch...especially for square cut pictures.

4.  Add embellishments to your bags using stickers, glitter, colored glues, ribbons, sequins, and feathers.
Add a phrase or words from the inside of the card!

Glitter and Ribbon make the bags especially festive!

Experiment with your supplies.


5.  Don't forget to embellish your tags also! Again, different colored glitters and stickers add sparkle and flare. Outline the edge of the tag with a coordinating color of glitter. Use white glue and poor glitter over the card, over a paper plate. Dump off the excess glitter and let dry before going to the next step. Use a different paper plate for each color glitter. Reuse the excess glitter on the plate...no waste!


6.  Add ribbon to your tag....just cut a peice of ribbon about 8 inches long and thread it through the hole you have already punched. Now you have an easy way to attach the tag to a gift and it makes the tag even prettier!
Before embellishments.
        
After embellishments!

Monday, July 19, 2010

No Bake Chocolate Oatmeal Cookies


The first time I ever had No Bake Chocolate Oatmeal Cookies I was in eleventh grade. I was 'in love' with my high school sweetheart, and his mother made a batch of these cookies and I declare, I think I forgot all about her son with my first bite. Of course, the cookies were eaten and I came back down to earth and once again mooned over her son. This happened periodically over the next year and a half - the duration of our courtship. But eventually, I out grew that romance. But I NEVER outgrew my love for these cookies!


Mrs. 'M' gave me her recipe for Chocolate Oatmeal Cookies, but over time the scrap of paper was lost. For many years, I was Choc-Oatmeal-Cookie-less. But as luck would have it, I purchased a cookbook on one of my many trips to the mountains, and low and behold, there was a recipe identical to Mrs. M's recipe. I have since also found the same recipe on several cooking/recipe sites on the web.

Now, these cookies are a Christmas tradition at my house. Usually, a couple of weeks before Christmas I make several different kinds of cookies, and this one is one of the favorites. And sometimes, I can't wait for Christmas time, and I make a batch just for my pure enjoyment. 


Warning: Occasionally, no matter how closely you follow the recipe, and no matter how carefully you measure the ingredients, or how carefully you time the boiling, these cookies will simply not turn out right. They will sometimes just not 'set'. They will end up a gooey, gloppy, mess. However; I have learned that even if they do end up a ooey-gooey mess that can't be picked up without the aid of a spoon, the are still delicious! Just put them in a bowl or on a plate and eat them with your spoon!


My version of No-Bake Chocolate Oatmeal Cookies

Ingredients:
2 cups sugar
1/2 tsp salt
1/4 cup cocoa
1/2 cup milk (whole works best)
1/4 cup butter
2 cups minute oats
1/2 cup peanut butter
1 tsp vanilla


Directions:

1. Mix sugar, salt & cocoa in saucepan.
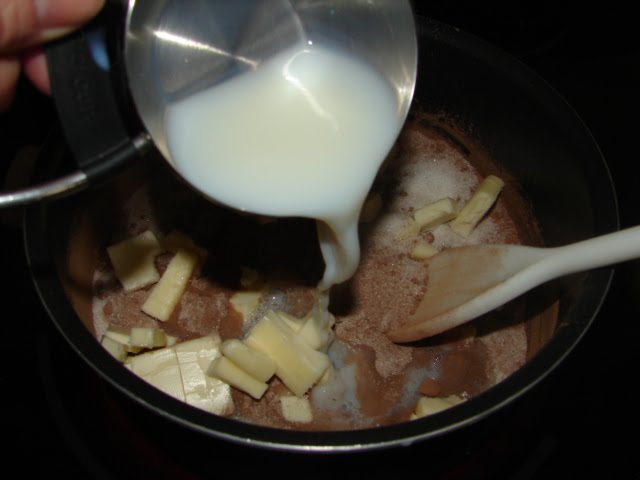
2.  Add milk and butter; mix well and bring to a boil over medium heat.


3. Remove from heat and add remaining ingredients. Mix well... 
...mix until the peanut butter is all dissolved. The mixture will start feeling thick. 
4. Drop dough in scoop or spoonfuls onto wax paper... 
...be sure not to waste a single morsel! 
The 'perfect' cookie is about 1.5" to 2" in diameter, 'sets', and is glossy until it dries. Store uneaten cookies in air tight containers for a day or two. If there are uneaten cookies after day two, move them to the 'fridge. They are delicious both hot and chilled!

Kitt Cat's Simple Notes:
* use chunky peanut butter for a nutty take on these cookies!
*eat these cookies soon, they don't store well
*will keep longer if stored in a plastic zip bag and stored in the fridge